DAW
Bitwig Studio: The Synth and Software Review

After installing Bitwig Studio and spending a few days with it, Jim Aikin was impressed
Learning a new DAW is always an adventure. Where are the zoom controls? How do I add automation? Do I use Q for quantizing, or Ctrl-Q, or something else? What are the keyboard shortcuts for the editing tools?
After installing Bitwig Studio and spending a few days with it, I was impressed. After two weeks, I’ve noticed a couple of limitations, but I’m even more impressed. It’s a full-featured, no-compromises program. Yes, there’s a lot to learn, but for the most part the user interface makes good sense. I had to pay close attention to find a few things that Bitwig can’t do, or that it does in non-intuitive ways.
That said, Bitwig is a bit different from anything I’ve encountered before. The built-in virtual instruments have an open-ended design that’s semi-modular, if not completely modular. Even the individual MIDI note events have some unusual features.
Am I going to cover every feature of Bitwig in this all-too-brief review? Of course not. Someone else might focus on different things. Rather than write an entire book, I’ll try to showcase enough items to give you a clear idea whether Bitwig might be right for you.

Figure 1. The main screen in Bitwig Studio. At the left is the Inspector panel, with the track headers next to it. The Clip Launcher (center area) contains a number of short clips, while the timeline-based tracks are to the right. An audio waveform is displayed along the lower side, with the project remote knobs to its right.
Overview. Let’s start with a check list of features. MIDI and audio? Obviously. A suite of built-in instruments and effects? Yes. Downloadable content? About 10Gb. Support for all of the standard plug-in formats? AU, no, but VST 2.4 and 3, yes. Also, the new CLAP standard is supported. Folder tracks? Yes. Instrument layers? Yes. Audio time-stretching and beat-matching? Yes. Comp editing of multiple takes in audio recording? Definitely. Automated punch-in/out? Yes. Built-in tutorials? A dozen of them. A big set of creative tools? You’ll be amazed. (Review author mumbles briefly, wondering what else to add to the list.)
It’s no sin to acknowledge up front that some aspects of the design of Bitwig Studio were inspired by Ableton Live. For starters, Bitwig has both an Arrangement, in which tracks run from left to right in a linear manner, and a Clip Launcher, in which short segments of audio or MIDI can be triggered either individually or in multi-track Scenes.
In Bitwig the two elements can coexist on the screen at the same time. You can work strictly in the Arrangement, or strictly in the Clip Launcher, or view them both at once, as Figure 1 shows. You can run some tracks from the Arrangement and others as Clips. But even if you’re planning to end up with a linear Arrangement, the dual layout makes it easy to drag clips back and forth in order to try out some options. There’s also a clip/mixer view (see Figure 2). It’s a very flexible system.

Figure 2. The mixer view in Bitwig bears some resemblance to Session View in Ableton Live. Here, the clips are stacked vertically, whereas in Figure 1 they’re arrayed horizontally. The panel of a Phase-4 synth is along the bottom. Between the clips and the synth are stacks of the devices, including instruments and insert effects, that are active in each channel.
As in Ableton, instruments, effects, and the piano-roll editor reside in a strip along the bottom of the main window. But in Bitwig, the vertical panel at the left is not the Browser but the Inspector. Its contents will change depending on what you click on. Click on a note and you’ll see its start time, velocity, and so on. Click on a track header and you’ll see the track options. The Inspector is extremely useful, and an essential part of the software.
There are two browsers that function interchangeably, one on the right side of the screen and the other a pop-up. I found the browsers rather confusing at first, and I’m still not sure I understand every detail of how they work, but the design seems to have some advantages. For instance, when I selected “dark” in the Tags field, I got presets in both built-in and non-Bitwig instruments, such as u-he Diva, that were tagged using the word “dark.” That’s pretty slick.
I noticed a small bug in the browser that prevents you from scrolling freely through long lists (and most of the lists will be long). Let’s say you select a synth preset from the browser list, but you aren’t sure it’s the right one, so you scroll down and see what else might be available. After a couple of seconds the browser list will scroll back up automatically to display the preset you had chosen a moment ago. I hope they’ll fix this, as it’s annoying.

Figure 3. At first glance the Polymer instrument seems quite simple, as there’s only one oscillator. But there are several different filter modes and several oscillator types, such as the wavetable oscillator shown here.
The included synthesizers are rather plain-jane, but that seems to be by design. As the factory presets demonstrate, the assumption seems to be that you’ll create your own layered instruments, add effects, add some custom modulation sources, and so on. Factory presets for the various sound generators typically include added effects, added envelopes, macro knobs, and other enhancements. There’s a lot to explore here, and some beautiful sounds.
A big part of learning Bitwig is learning where various commands and options are to be found. Often it’s obvious, but sometimes not, and I spotted a couple of things that it doesn’t seem to do. I couldn’t find a key command for toggling the record pre-roll on and off; to do that, you have do a Ctrl-comma to open the great big Settings box and then do a couple of mouse clicks.
MIDI notes that are played a bit too early when starting to record are not recorded, unfortunately, and Bitwig has no background MIDI or audio capture that will grab whatever you’ve doodled on the keyboard while not in Record mode. However, I’m told birdsthings.com has a plugin for $14 that captures unrecorded MIDI.
Over the years I’ve migrated from one DAW to another five or six times, and poked around in a few others. The keys to the learning process are (1) patience, (2) click on anything you see, (3) don’t start a major project for a few weeks, (4) try Shift, Ctrl/Cmd, Alt/Option, right-click, and double-click in any combination, (5) watch a few tutorial videos on YouTube, (6) log in to the user forum (the Bitwig forum is on KVR), and (7) search the manual for clues. If you can manage all that, I suspect you’ll be very happy to discover Bitwig.
Clips and Tracks. As mentioned earlier, both the Clip Launcher and the Arrangement can be viewed at the same time, and some instruments or audio channels may be playing from one while others are playing from the other. The buttons for switching are easy to see, but they’re colored in an odd way. When the button is highlighted in light gray, that side of the track is off, not on. When the button is a dim gray, that side is active. Until you get used to how this works, it can be a bit confusing.
Editing the contents of a clip is easy: just click on the clip, and it pops up in the editing area at the bottom of the screen. If there’s automation data, you have to use the track header to cause it to be displayed in order to edit it. This is a bit different from how I’m used to working, but it’s not difficult.

Figure 4. Opening up the patch shown in Figure 3 reveals the effects that have been applied. Dozens of different effects are available, and there can even be effects within effects. You can add any plug-in effects in your system to the lineup.
At first I thought it was harder to launch Clips from QWERTY keystrokes than it is in Ableton, because Bitwig’s keystroke and MIDI-key-activated commands are stored at the global level. But I was wrong. Section 15.4 of the manual explains how to assign QWERTY or MIDI keys to launch individual clips with assignments that will be stored with the song.
When you select a clip in the Clip Launcher, you’ll find many of the expected functions displayed in the Inspector panel. A clip can be followed by the next clip for that track, or the previous clip, or a random clip, and so on. The same options are available for entire scenes (collections of clips that play different tracks). When there are gaps in the groups of clips for a track, the follow actions allow you to jump to a new group. There are a lot of other possibilities here for creating an interactive live performance set, but let’s move on.
Instruments. Bitwig is not as well supplied with built-in instruments as some DAWs, nor are the instruments as well supplied with presets. Polysynth is a two-oscillator analog-style synth. Polymer (see Figures 3 and 4 above) has only one oscillator, but it has a choice of types, including a wavetable option with eight different factory wavetables. Phase-4 (see Figure 5 below) is a good four-oscillator phase distortion (basically FM) instrument, and Sampler has quite a lot of multisampled content, plus a granular synthesis mode. The Grid instrument is interesting enough to deserve its own section (see below).

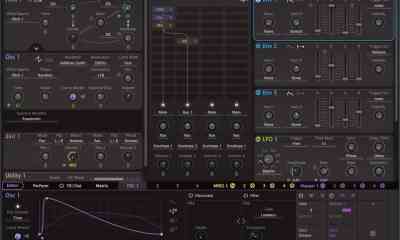
Figure 5. The Phase-4 instrument implements four-oscillator phase modulation synthesis (similar to FM) with a filter. Phase-4’s oscillators don’t have built-in envelope generators, but envelopes can easily be added as needed using the Modulators. Eleven modulators are used in this patch.
At first I was inclined to shrug at the built-in instruments, both because I have way too many VST synths already and because I was finding it difficult to locate the preset lists for the built-ins in the browser. Once I got that sorted out, I found quite a lot of solid sounds.
Several synthetic percussion instruments are available, and they can be loaded into pads in the drum machine. The drum machine (see Figure 6 below) has a couple of tricks up its sleeve. Up to 128 pads can be assigned different sounds, and each pad can have its own effects. A typical effects chain (or at least a portion of it) is shown in Figure 4. Not only that, but each pad can load not a sample or an internal e-percussion voice but any other sound producer you happen to have handy, including loops and VST instruments. This is an ideal way of creating a complex percussion section that only occupies one sequencer track.
Another neat thing you can do is build instrument layers. After selecting an instrument, hit Ctrl-G, and now you can start adding more instruments, all of which will be played by the same MIDI notes, or by different MIDI notes in a single track if you apply Note Effects. Each of them can have its own audio effects chain added, as well. Layers containing third-party VST instruments, or a combination of built-ins and third party ones, are just as easy to set up.
Bitwig’s sound library includes several gigabytes of orchestral sounds. I never use orchestral sounds, so I didn’t download them.

Figure 6. Up to 128 pads in Bitwig’s drum machine can be given their own sounds and attached effects.
Pitch imperfect. Bitwig provides some unusual and possibly very useful ways to alter in performance the pitches of individual notes in its built-in instruments.
You can add pitch-bends to individual notes in a polyphonic texture by editing the micro-pitch data attached to each note. This data can be displayed and edited in the piano roll, as shown in Figure 7 below. Again, this works only with built-in instruments (and possibly with CLAP plugins), not with your VST synths. You can record micro-pitch expressions of this type into a MIDI clip using your hardware pitch wheel, but I don’t advise this, because once it’s recorded, you can’t re-record or overdub it.
If you’re not satisfied with the performance you’ve recorded during your initial pass, your best option is to edit the micro-pitch contours with the mouse. Due to a bug in 5.1.8, if you’re recording this type of expression into a clip and you happen to want to jam the pitch wheel up or down to its maximum or minimum and keep it there for a beat or two, you’ll find that the micro-pitch expression data will “decay” back toward center pitch rather than remain at the value you played. This is fixed in 5.1.9, and I’m sure it will be fixed in the official release of 5.2, which is now in beta.

Figure 7. With Bitwig’s built-in instruments (though not with third-party plug-in instruments), Bitwig can do polyphonic pitch-bends. In this example the upper note is bent down while the lower note is bent up, so that their pitches cross.
As an alternative, you can record pitch-bends into the built-in instruments as MIDI data in the usual way. Setting this up takes three extra steps, where every other DAW in the world does it automatically and transparently. But it does offer some advantages, such as being able to bend the pitches of different oscillators within an instrument by different amounts.
Micro-pitch control is also available with the built-in instruments as a Note Effect. You can tune each of the 12 pitches in a standard octave with one-cent resolution. At first this implementation might seem to be limited to 12-note-per-octave scales, but by tuning the size of the octave I was able to set up microtonal keyboard layouts with 19 or 24 equal-tempered notes per octave. (You’ll find a calculator useful for this.)
Even more fun for some purposes, you can use this Note Effect to pitch-bend each of the 12 MIDI keys in an octave up or down by different amounts using the mod wheel or any other MIDI CC message. I’m not aware of any other MIDI instrument that can do this.

Figure 8. The Polygrid instrument is fully modular. Its basic panel is shown along the bottom, and the detail editor can be opened, as seen here, to fill most of the screen. Menus of possible modules are shown in the strip along the top. The eight macro knobs toward the left end of the lower panel are one of a number of macro sets for this instrument. Macros are conveniently set up in most of the Bitwig instruments so as to allow easy editing of the sound without the need to study the patch and figure out what’s going on. Ten instrument-level modulators are visible in the little squares in the center of the lower panel. Such modulators can be applied to any instrument, either built-in or third-party.
The Grid. Several DAWs provide a fully modular patching environment for sound design. Ableton Live Suite has Max For Live, FL Studio has Patcher, and so on. Bitwig’s Grid (see Figure 8) sits midway between the two. It has a lot more modular widgets than Patcher, but unlike Patcher, it won’t load third-party plug-ins. It lacks the depth of Max For Live, and there’s no provision for designing your own user interface, as in Max, though you can create banks of assignable knobs and buttons. But the Grid is easier to use than Max, and with more than 200 modules to choose from, it can produce an enormous variety of sounds and musical textures.
In addition to the inevitable oscillators, filters, envelopes, and LFOs, the Grid has a good selection of logic and math modules, several step sequencers, waveshapers, random generators, and a modest set of effects. There’s even a simple Recorder module, with which to capture and then trigger signals that have been moving through the Grid. I wasn’t able to get the Recorder module to do its thing in version 5.1.8, and the folks at Bitwig couldn’t duplicate the problem even after I sent them a project file that demonstrated it. This could have been user error on my part, but in any event it’s not a big deal.
Instead of making your own synthesizers with the grid, you can make effects patches or note processors, or use the ones that come with the program. However, the documentation for Grid modules is useless. The assumption seems to be that these devices are so simple you’ll have no trouble figuring them out.
If you’re just getting into modular synthesis, the Grid would be a fine starting point. If you start to get serious about modular software, I’d suggest downloading VCV Rack. It goes much, much further.
Modulators & Operators. Central to sound design in Bitwig is the concept of modulators. These are small, efficient signal sources (LFOs, envelopes, step sequencers, and so on) whose output can be applied to just about anything.
Let’s say you’ve loaded a VST synth that only has two envelope generators, and you need a third one, perhaps to do some pulse width modulation in a virtual analog synth. It’s easy: just add an ADSR to the instrument’s control panel and assign it to the plugin instrument’s pulse width. Every modulator in the instrument’s control panel will respond to note-on/off messages just as if it were part of the plug-in synth.
With the built-in instruments, the same modulators can also control any effects you’ve added to the instrument’s signal chain. When using third-party plug-in instruments, a separate modulator has to be added to the effect, but this is no big deal. Change the wet/dry mix of a reverb with an ADSR? No problem.
There are more than 40 different modulators to choose from – and if you mouse their controls while recording, the mouse moves will be added to the track. This is a great way to add subtle or over-the-top expression to your music. Naturally, one modulator can modulate the controls of another.
Operators are for notes and clips what modulators are to sound design. Most of the options for clips apply when you have several clips sitting side by side in the Clip Launcher, as mentioned earlier in the section on clips and tracks.
Note operators come into play when a clip repeats. Any individual note can play the first time through, or not play the first time but get added when the clip repeats. A note can play when a previous note of the same pitch (or drum note) plays, or when the previous note doesn’t play. Notes can have probabilities of playing. A note can play or not play on alternate repeats of the clip. Using these tools, you can add quite a lot of variation within a single clip without having to make copies of it.
Ratchets can also be added to individual notes. These are not simple ratchets. Instead of repeating with a fixed rhythm, the sub-notes in a ratchet can speed up or slow down, and a velocity taper (up or down) can be included in the ratchet. Notes played by the built-in synths can have individual offsets for gain, pan, pitch, and other things.
And then there are the Note Effects. The devices here include things like note repeats, a note filter (for setting up keyboard zones), a chord generator, an arpeggiator, and a whole lot more. This is why the built-in instruments seem rather bare-bones at first: numerous functions have been exported into a semi-modular environment.
Audio. I didn’t test Bitwig’s audio features exhaustively, because I’m sort of a MIDI guy, but I did try recording a vocal and then comping together five different takes into one track to make my awful singing slightly more presentable. Comping works as expected: no problems.
Samples that are recorded beats (such as drums) can be sliced automatically and the slices assigned to individual cells in the drum machine instrument. The slicing can be done either on regular beats or at the onsets of drum hits detected in the audio. You can add or delete onsets as needed before doing the slicing. This is a great way to customize a sampled drum loop, especially when you realize that each individual drum machine note can be assigned its own effects. Want reverb just on one snare hit? No problem.
Within each audio clip, you can edit the gain, pan, pitch, and formant from moment to moment. To add curvature to a segment between two of your edit points, Alt-click and drag.
The takeaway. If you’ve read this far, you’ve got the idea. Bitwig Studio is an amazing platform. It’s not perfect, but it’s definitely a high-end next-generation DAW. I’m not sure I’d recommend it to folks who are new to computer-based recording, because there is certainly some potential for confusion due to the huge variety of features. But if you already know what ADSRs and LFOs are, and if you understand a few basic concepts like modulation routings, you’ll soon feel right at home.
There’s a 30-day free trial demo, so why not give it a try? I’m betting you’ll be glad you did.


The Passing of Jack Hotop, Legendary Sound Designer and Innovator

Arturia Memory V Memorymoog Software Emulation Is Here

Enter the Win a Sequential Fourm! Ends May 31, 2026

BLEASS Spectral Resonator – That Robotic Sound

Synth Repairs: Long Waits, High Prices

u-he Zebra3 – the Synth and Software Review

KV331 Audio Releases SynthMaster 3 Player iOS

Melbourne Instruments brings Braids engine to desktop NINA analog polysynth

New For Behringer UB-1 Micro: 100 Ultimate Patches

New Quadtrack Computer-Based Groovebox
-

 In This Issue2 weeks ago
u-he Zebra3 – the Synth and Software Review
-
Software News3 weeks ago
KV331 Audio Releases SynthMaster 3 Player iOS
-
Analog3 weeks ago
Melbourne Instruments brings Braids engine to desktop NINA analog polysynth
-
In This Issue3 weeks ago
New For Behringer UB-1 Micro: 100 Ultimate Patches