Covers
Image-Line FL Studio 21.2.3: the Synth and Software review
When is a DAW like a box of chocolates?
If you’re like most Synth & Software readers, you probably create your music in a DAW. There may be a few sources of annoyance and frustration that pop up while you’re using your DAW, but you put up with them because you know the program. You can work quickly, and the snags don’t seriously impede your music-making. All DAWs these days are super-powerful, so why would you want to learn an entirely new user interface in order to trade one set of annoyances for another?
I can think of two reasons. Maybe those annoyances and frustrations are getting in your way more than you realize. Or maybe you’re feeling stale, so switching to a new workflow could spark some fresh inspiration. Also, some people use two different DAWs for different purposes: one for composing and another for mastering, for instance.
Recently I decided to get serious about learning Image-Line FL Studio. Or rather, re-learning it. I made some music with it ten or twelve years ago, so I remember the basics, but FL is very, very feature-rich, and a lot has changed. If the thought crosses your mind even occasionally that maybe you ought to try a new DAW, FL Studio is well worth looking at.

This article is not going to be a complete review of FL Studio, but I’ll go into enough depth that you should be able to get a clear idea whether it might be right for you. I’ll start with a quick overview and then point out some features that are unusual or just plain cool.
Overview. The first thing you need to know about FL Studio is lifetime free updates. That’s right: once you’ve bought it, you’ll never have to pay when a new version is released. If you’re arriving late to the party, this won’t save you any money now, but down the road it will save you hundreds of dollars, so there’s that. (Full disclosure: I reviewed FL 1.0 for Keyboard magazine more than 20 years ago. My original license is still valid for version 21.)

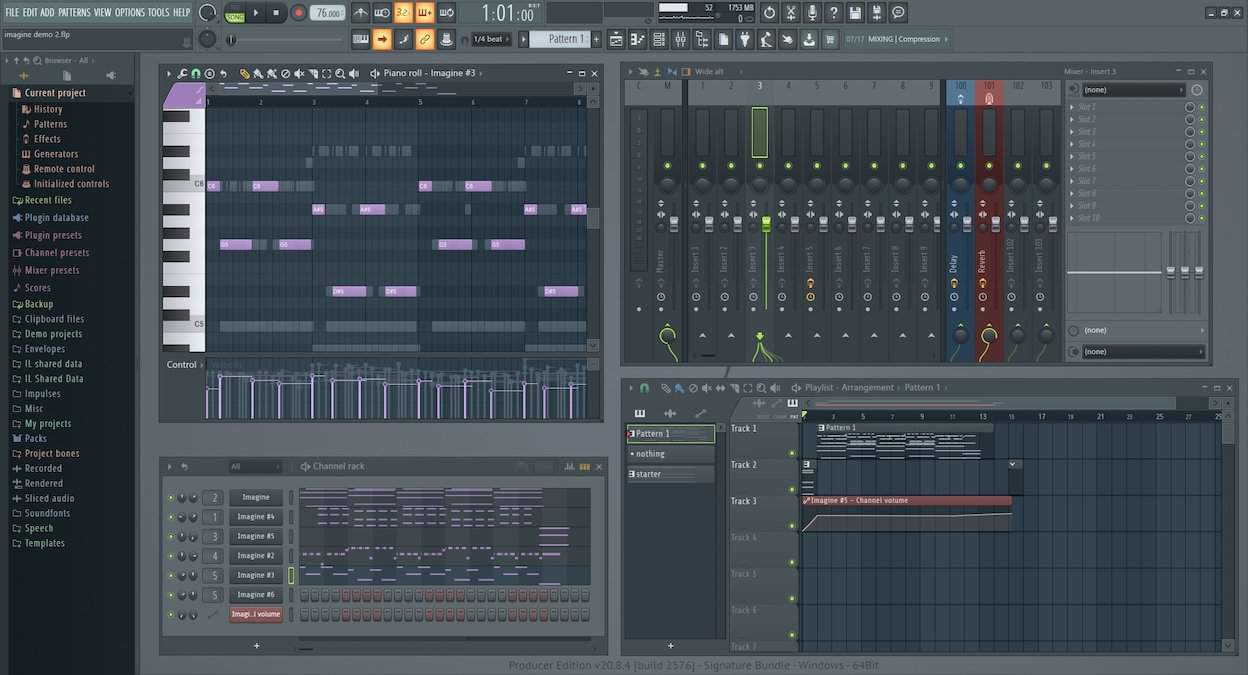
Some DAWs, such as Ableton Live, like to pack the whole user interface into a well-organized display. FL is proudly multi-windowed, as the graphic at the top of this article shows.
Clockwise from the left are the browser, the piano-roll editor, the mixer, the playlist, and the channel rack. These are all free-floating windows that you can resize and drag around as needed, or open and close using the computer’s function keys. As with any DAW, learning the keystroke shortcuts will save you a lot of time.
Unlike most DAWs, FL does not enforce a linkage between a software instrument, a playlist track, and a mixer channel. You can organize your project that way if you like, and in fact there’s a nice bit of drag-and-drop functionality that will both do the routing for you and name the mixer channel and the playlist track with the instrument name. But there are other ways of doing it.

The instruments live in the channel rack, and each instrument can be assigned to any mixer channel. Many different patterns can be created directly in the channel rack, and each pattern can then be positioned in any track in the playlist. This may be a bit confusing at first if you’re used to a conventional workflow, but it actually gives you more freedom. If you have an idea for a different chord progression or a different beat, you can switch back to pattern mode, record your idea, and then try positioning it in the playlist to see whether it fits.
FL Studio is packed with drop-down menus. One of the challenges, as you’re learning it, is remembering which menu contains a given command. Any time you see a tiny white triangle, click on it. Gray icons in the shape of gear wheels also open up hidden options. Some of the menus are a bit of a jumble, though. If you have as many VST synths as I do, the menu of plug-ins you can insert into the channel rack becomes, frankly, a mess.
The playlist is where you’ll assemble your projects. Playlist tracks are stacked vertically in the usual way, and playback proceeds from left to right. What’s unusual about FL Studio is that any playlist track can contain audio, MIDI patterns, and/or automation data in any combination.
Furthermore, each MIDI pattern can contain samples or notes for any combination of your MIDI instruments. For instance, one pattern might contain both the bass and five percussion tracks, each with a different drum sound. This can get a bit confusing until you understand it, but it’s quite handy, as it allows you to build an arrangement quickly.
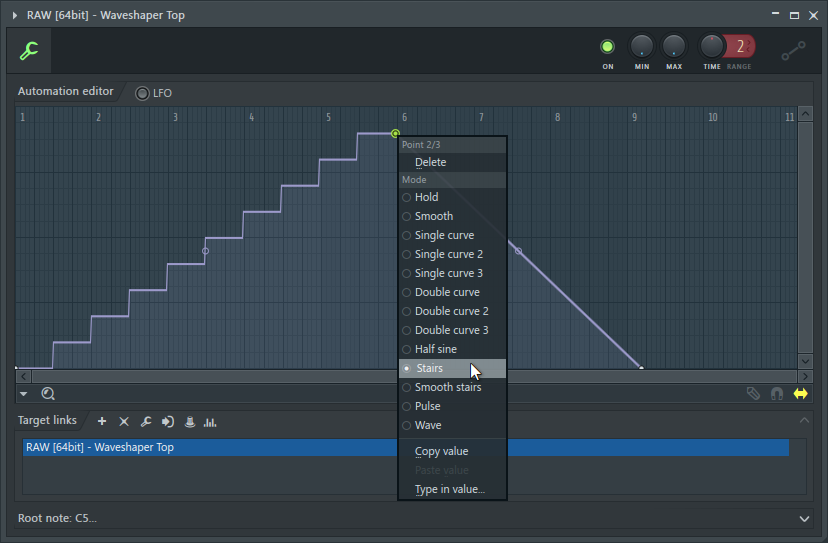
Figure 1. Curves in FL’s automation clips are not always curvy. Right-clicking on a node opens up a menu of different curve types.
Beware the Curves. These days, most envelope generators have curvature handles on the graphic display of the envelope segments. Drag the handle up or down and you change the curvature of the segment from convex to concave. FL Studio goes further than that. Individual segments can be turned into staircases (see Figure 1) or into a row of square or pulse waves. For music with strong rhythms, this feature can be extremely useful.
On the other hand, FL’s handling of MIDI controller data is workable, but far from ideal. You can draw a MIDI CC data curve in the piano-roll editor with a pencil tool, but there is no direct way to select a group of points in a recorded CC move, so you can’t do things directly in the piano-roll such as move a pitch-bend to a slightly earlier spot. Using a utility command, you can convert the MIDI data to an automation clip. In that form it clutters up the Playlist a bit, but the data can be moved, copied, and edited with great flexibility.

Figure 2. In the Fruity Formula Controller you can link two or three modulation signals and write an equation for the desired output.
Modulation Logic. The Fruity Formula Controller (see Figure 2) is the tool with which to massage your controller data stream using math operations. Oh, and by the way: the “fruity” word, which you’ll encounter here and there, is a reference to the fact that the program was originally called Fruity Loops. When it started to be successful, General Mills, which owns the Fruity Loops brand of cereal, convinced Image-line to change the name. But certain of the included plug-ins are still Fruity.
The Formula Controller has three inputs (a, b, and c). By default these are knobs, but each knob can be linked to a MIDI input from your favorite slider box, to controller data you’ve already recorded, or to the output of the Fruity Peak Controller.
The Peak Controller is basically an envelope follower. This implementation would let you park three Peak Controllers on different mixer channels and combine their outputs in order to do some complex ducking of another sound by using the simple a+b+c formula. Instead, you could use a formula like (a+b)*c and assign the c input to a real-time slider, so that the amount of ducking produced by the (a+b) element would depend on how you’re moving the slider.
Trigonometric and logical functions are available, and even the song position or mouse x or y position can be used as an input. You may not need this depth more than once in a blue moon, but when you need it, it’s there.

Figure 3. The Envelope Controller is inserted as an instrument, but it doesn’t make a sound. Instead, each time it receives a MIDI note, it can output up to eight envelope curves, eight LFOs, and other modulation signals suitable for controlling whatever you choose.
Also of interest is the Envelope Controller (see Figure 3). This is not just an envelope generator; it’s eight envelope generators coupled to eight LFOs and other modulation possibilities. They’re called articulators.
The Envelope Controller is instantiated as an instrument. Each time a note occurs on that track, the articulators that are active in the key zone of the note send their modulation signals to whatever destinations you’ve set up. This is a great way of adding rhythmic modulations to instruments whose own modulation possibilities may be limited.
Slippin’ and Slidin’. The next cool feature to mention works only with Image-Line’s own instruments, not with VSTs. Even with the Fruity edition ($99) you get a few useful built-in instruments, but the All Plugins Edition ($499) is well worth considering if you’re short on great-sounding synths, as it includes Harmor, Morphine, Ogun, Poisone, Sakura, Sytrus, and Toxic Biohazard, among other things.
The Image-Line instruments can do polyphonic pitch-slides of arbitrary lengths and target note values. Think of this as pedal steel guitar pitch-bending on steroids. For instance, after programming whole notes in a C major triad. you could have the G glide up to B during an eighth note on beat 2, the E glide down to D during a quarter note starting on beat 3, and the C glide down to an A flat also on beat 3 over the course of a sixteenth note and then up to a high F on beat 4. I’m not aware of anything else like this. Not even MPE can do it, because in FL Studio the glide rate is controlled from the piano roll, not from a knob in the synth.
Flex. As a dedicated tweaker of synth parameters, I was inclined at first to turn up my nose at Flex. The user-adjustable parameters include the filter, a couple of envelope generators, a pitch slider, a couple of effects, and eight macro sliders, whose function will change from one preset to another. But by the time I downloaded all the free banks of Flex presets, I had more than 1,500 different sounds to choose from. Most of them seem to be sample-based, but at least one is clearly 4-operator FM, so there may be several sound engines lurking under the hood in Flex.
On the downside, none of the presets that I tried responds in any way to the mod wheel. Okay, I just won’t use Flex when I need vibrato.

Figure 4. Beepmap turns image files into weird swirling cascades of additive sound.
Silly synthesizers. Beepmap (see Figure 4) is a synthesizer only by the most liberal definition of the term. It makes sound, right enough. It even has a multimode filter, envelopes, and LFOs. But the sound source is a graphic image.
Beepmap loads a graphics file, usually a .jpg, and interprets the file using additive synthesis. The horizontal rows of pixels are sine wave partials (which you can spread out using the frequency knob) and the vertical rows are the time position of the output, which can be slowed down or sped up. You use the red values in each RGB pixel to control the amplitude of the partial in the left speaker, and the green values determine the amplitudes in the right speaker. The blue values can be switched on or off; if they’re on, they modulate the spread of the frequencies of the partials.
Beemap’s results are not very predictable, but twiddling the controls is a lot of fun. It is good at doing spacey noise pads and gargly noises.
Also on tap is a speech generator. This can produce a variety of obviously robotic voices, which are rendered as samples. What makes this interesting is that you can type any phrase you like, up to and including, “She blinded me! With science!”

Figure 5. The control panel for one of the Patcher devices included in FL Studio. You can create your own Patcher patches and edit the panel widgets.
Patcher. Several DAWs have open-ended patching environments for wiring modules together. FL Studio has Patcher (see Figures 5 and 6). If you have, for instance, a favorite layered sound that uses two different synths and two or three effects plugins, you can build it in Patcher and then save your patch for later use in other projects.
Patcher is quite easy to use, and it allows you to build a control panel so you can make sonic adjustments without having to go in and fiddle with the parameters of individual plug-ins. A couple of basic MIDI widgets can be used to intercept the incoming performance data.

Figure 6. The internals for the factory Patcher device whose panel is shown in Figure 5. Wotta mess! Fortunately, you can drag the modules apart to study and edit the signal flow.
FL ships with a small but possibly useful set of Patcher patches, so be sure to check them out. The factory patches, as seen in Figure 6, are not easy to understand at a glance, but the window is resizeable, so you can drag the modules apart in order to study the signal flow.

Figure 7. Programmable scratching in Wave Traveller.
Wave Traveller. Is scratching too old-school to talk about? I wouldn’t know.
Wave Traveller (see Figure 7) isn’t something I would use every day, but it’s a good example of just how visionary FL Studio sometimes is. If you need some scratching and you don’t have a turntable handy, Wave Traveller will do the job nicely.
The process is simple: after loading an audio file (drag and drop works fine), you can define a playback curve for each separate MIDI key and then trigger the pre-programmed scratches from your keyboard or pad controller. If the curve is nearly horizontal, the playback will be slow. If it descends from left to right, the playback will be backwards. A single curve can go up and down several times if that’s what you need.
As many as 120 different scratches can be defined for a single sample, one for each MIDI note. You can also narrow the range over which the curve will operate, tune the output up or down, and a couple of other things.
Advanced MIDI edits. You say your synth doesn’t have an arpeggiator? No problem. FL Studio can slice your whole note chords up into boring arpeggios. If you’ve quantized the chords but they’re a little too monolithic for you, FL will be happy to strum the start times. It will even alternate up-strums with down-strums, which could come in handy if you’re sequencing some MIDI guitar chords.

Figure 8. If you need some fresh rhythmic and harmonic inspiration, maybe FL’s Riff Machine can help.
And then there’s the riff machine (see Figure 8). This utility creates both a basic chord progression and a rhythmic riff. There are a lot of controls, and also a number of preset patterns stored on the hard drive, but what exactly it’s doing, I haven’t the least idea. Play with it. Maybe you’ll stumble into something groovy. I did.

Figure 9. Edison is FL Studio’s built-in audio editor. The icons in the row above the waveform display open up menus and dialog boxes with editing commands. The vertical lines create auto-detected regions.
Edison. If you use samples or your own audio recordings in projects, you’ll want to get comfy with Edison (see Figure 9). Edison is not included in the entry-level Fruity edition of FL Studio, but it’s in the three higher-priced versions. It’s a powerhouse audio editor. As a bonus, the tutorial videos on how to use it are excellent.
Let’s suppose you have a drum loop that you’ve downloaded from somewhere or other. You can bring it into Edison, add markers to indicate where the separate drum hits are, zoom in to adjust the markers as needed, export the marked regions as individual samples, and drag them back into the FL channel rack as individual samples so you can sequence your own beat using the raw drum hits from the loop.
Normalize, filter, fade in or out, time-stretch, denoise, add reverb, analyze pitch in monophonic music clips — Edison will do the job. Why it’s inserted as a do-nothing “effect” in a mixer channel may seem odd, but that’s because it’s also an audio recorder.
Drumaxx. Other than Edison, everything mentioned so far in this review is included in all of the versions of FL Studio. Drumaxx, however, is available only in the All Plugins Edition, or as a separate purchase that will run in any version of FL Studio but not in other DAWs.

Figure 10. Drumaxx is included only in the All Plugins edition of FL Studio. It boasts 16 channels of physical-modeling percussion, not to mention its own internal step sequencer.
Drumaxx (shown in Figure 10) is a 16-channel drum machine that uses physical modeling rather than samples. It also has a four-bar step sequencer. The main advantage of a drum machine based on physical modeling is that you can control up to four parameters from velocity or automate more than two dozen of them over the course of a single measure, a longer pattern, or the whole song. If you don’t want to design your own drums, you can load any of the dozens of pre-programmed sounds in folders containing cymbals, hi-hats, kicks, snares, toms, sound FX, and assorted percussion.
Snags & Snarfles. Let’s start with the biggest issue many musicians will face. FL Studio doesn’t ship with a large library of sampled loops. To be honest, this puts it at something of a disadvantage when compared to a couple of other DAWs. I almost never use sampled loops, so this doesn’t bother me.
As you dig into FL Studio, you may find a few things that don’t behave quite the way you would prefer. The classic example is pitch-bend depth. When you insert a VST synth, it lives in a standard wrapper object, which lets you do various useful things, such as routing its multiple audio outs to different mixer channels. So far, so good.
The wrapper also has a pitch-bend depth parameter. This always starts with a value of 2. You’d think this would correspond to two half-steps — and indeed, with the built-in Image-Line synths, that’s what it does. But with VST synths, you always need to crank this parameter up to 12 in order to get the full range of the pitch-bend depth programmed in the synth. This issue has existed for many years, and for some obscure reason Image-Line has never fixed it. It’s not actually a problem; as long as you know it’s there, the fix is simplicity itself. It’s just weird.
The FL manual is online, and it’s not downloadable as a PDF. It’s extensively cross-linked, which makes it easy to use in a browser. The downside is, you can’t search the whole thing looking for a particular word that relates to what you’re hoping to learn. Such as it is, the solution is to type your question into Google and let Google hunt for the answer. There are lots of tutorial videos on YouTube, but many of them were produced by enthusiastic amateurs, and the explanations are not always nailed down.
The Performance Mode in FL Studio was obviously inspired by Ableton Live. It’s not nearly as easy to set up and use as the clip launching in Live, and the documentation is not very helpful, but after struggling with it for a while I managed to arm-wrestle it into submission. The videos suggest that if you want to use this feature, a pad controller with lighted pads would be the ideal interface.
The snappy concluding paragraph. Once you learn your way around, using FL Studio can be just plain fun! It encourages you to think about your music in new ways, and there’s also the ego boost of thinking, “Heh-heh. I know how to do that.” In this article I have by no means touched on everything in FL Studio, but maybe I’ve hit enough of the high spots to encourage folks to give it a serious look.
Speaking of which, the free downloadable demo version contains everything in the All Plugins Edition, and it’s not time-limited. The main thing it won’t do is, it won’t load any of the projects you’ve saved. You’ll have to purchase the software to reload your creations. But considering the lifetime free updates, I’d call that a good investment.
Oh, and one more thing: in Windows, at least (I can’t speak about the Mac version), FL Studio launches very, very quickly compared to the other DAWs I use. Five or six seconds, usually. Instant gratification is a nice feature.
Prices: Fruity Edition $99, Producer Edition $199, Signature Edition $299, All Plugins Edition $499.


Arturia Rev OCEAN – a Big, Evolving Reverb Ambience Processor

Cherry Audio Releases an Ensoniq ESQ-1 Synth in Software (updated with 2026 features)
Gforce Software Releases Official Prophet 5 Plug-in with Sequential

Arturia’s New MiniLab 37 MIDI Controller

Novation’s Launchkey 61 MK4 White Keyboard Controller With Five Octaves
Arturia’s New MiniLab 37 MIDI Controller

When In Rome…

Introducing Absurdly Quiet Piano Pro

New From AAS – Organix for Chromaphone


