Features
Discover CSound – Free, Expert-level Software for Synthesis and Composition
A couple of weeks of study and you’ll be able to do just about anything you could dream of in the way of sound synthesis – and some things you’ve never dared to dream of
Have you ever wished your DAW and synth plug-ins could do something that they just plain won’t do? Have you ever dreamed of designing your own software instruments? Do you enjoy strange experimental music? Are you bored and looking for a fresh challenge? If you answer “yes” to any of these questions, Csound might be about to come into your life.
Or maybe you’re on a limited budget and need some powerful music software that’s absolutely free. Or you know someone who would love to make electronic music but is blind and as a result finds it impossible to use a mouse to turn the knobs on standard music software. Those are all good reasons to check out Csound.

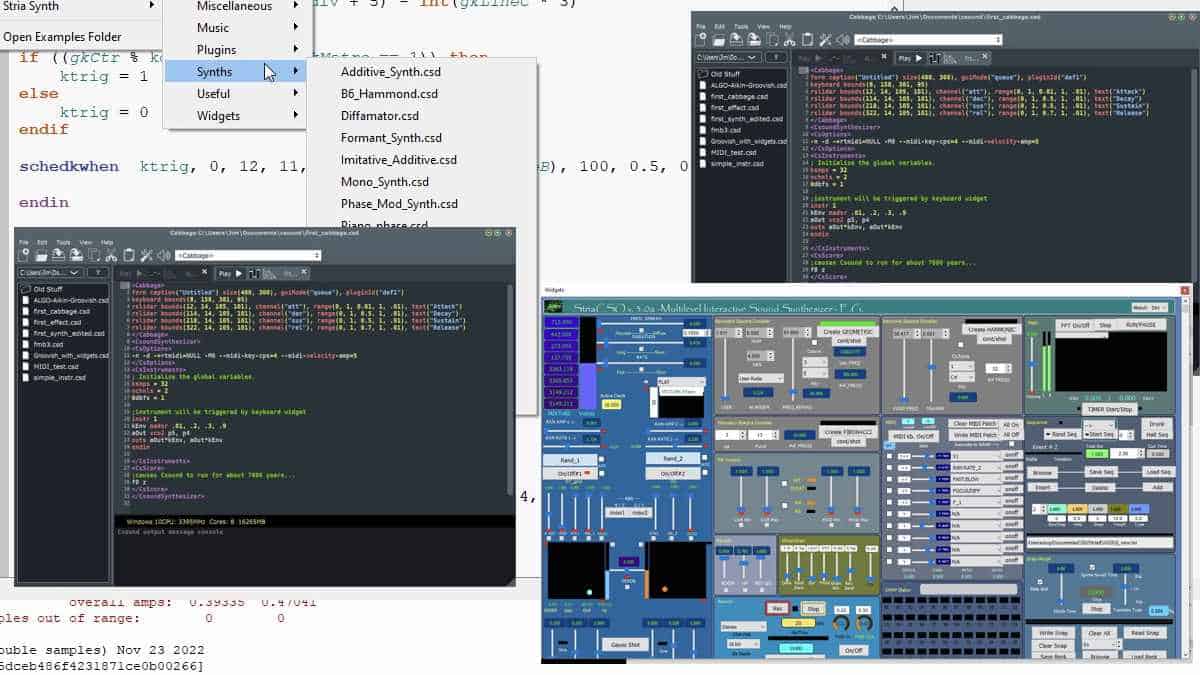
Figure 1. CsoundQt is a very useful IDE (integrated development environment) in which to run Csound. Here, the code is visible in the central panel. At the left is the Inspector, which is useful for navigating long files. At the right is the reference manual. Along the bottom is the Console, where output messages from Csound itself will appear. The Examples menu displays a few of the many examples of working Csound files that you can experiment with.
Admittedly, making music in Csound does require that you learn a bit about computer programming, complete with typing lines of code. If you’re mainly interested in searching the preset list for a great bass sound, making pop music, and finishing your mixes quickly, Csound is probably not for you. But if you’re comfortable learning new technology, and especially if your musical tastes are a bit outside, Csound could be an ideal solution.
Even though you’ll have to learn about coding, Csound provides an elegant framework that makes it easy to get up and running quickly. With only a week or two of study you’ll be able to do just about anything you could dream of in the way of sound synthesis, as well as some things you’ve never dared to dream of. And if you get stuck, you’ll find both online resources and an active community of users who will be happy to help you figure out what’s what.

In this article I’ll cover a tiny bit of the history and a few of the more recent developments, explain the very basics of what you’ll be doing as you use Csound, and take a quick look at three very different but very powerful software front ends that will make your work with Csound much easier.
Then & now
Csound is almost 40 years old. It was first developed in 1985 by Barry Vercoe at MIT. That was long before computers could do real-time audio. In those days, you would type your code into a terminal, start the compiler, and then go out for dinner. When you returned, you’d have a short piece of digital audio to listen to. Unless your code had bugs, in which case you wouldn’t.
Today, Csound is fully real-time. You can create a Csound instrument and play it via MIDI, or develop a full score containing thousands of notes, click the Play button, and hear it immediately. You can develop your own VST plug-ins with Csound, learn Csound coding in your web browser without downloading anything, or even edit an instrument on the fly while your music is playing. To design a user interface for your Csound instrument, you can use a preconfigured library of graphic widgets, including knobs, sliders, buttons, and drop-down menus.

One of the strengths of Csound is that it’s fully backward-compatible. Music composed 35 years ago using an early incarnation of Csound can still be loaded into the current version, and it should play back with exactly the same sound it had originally. This is emphatically not the case with any DAW I know of. Old DAW files sometimes fail to load, for example because an older plug-in isn’t compatible with your new computer operating system. Music you compose today using Csound should still be playable 30 years or more in the future.
There are no guarantees, of course. Csound is actively maintained by a community of software developers, all of whom are unpaid volunteers, and every new release (at this writing, we’re at version 6.18) includes bug-fixes for things that didn’t work right in the last release.
Csound has plenty of resources with which to make music – not just analog-style oscillators and FM but filters, reverbs, granular synthesis, wavetable scanning, and more esoteric functions. There are hundreds of opcodes, each of which will do something specific if you type the input arguments correctly.
Opcodes? Input arguments? Yes. Also variables, logic operations, data tables, and other concepts. There’s a learning curve, and in some sense Csound is an expert system. It’s definitely not plug-and-play. As you’re learning, there will often be times when you’ll try something, it won’t work, and you won’t understand why. Solving little problems along the way is absolutely normal. It’s also the case that the documentation is not always updated to reflect new features.
If all that doesn’t intimidate you, keep reading. In the next section you’ll discover the very basics of how Csound works and find links to Web pages where you can learn more.

How it works
Every Csound file defines at least one instrument, and also a list of events called a score, which will control when the instruments start and stop. Things like effects and step sequencers are all considered instruments, and a score might be as simple as an instruction to start running and then keep running for an hour waiting for MIDI input, but the instrument/score structure is basic.
Both instruments and the score are defined by typing lines of computer code. You can do this in any text editor (not a word processor!) and then run Csound from your computer’s command line. But most people prefer to use an IDE (integrated development environment), which will provide syntax highlighting, start/stop buttons, and handy utilities.

Figure 2. This Csound code creates a simple but playable instrument.
An example of an extremely simple Csound instrument is shown in Figure 2. Can you figure out what it does? Here’s a hint: the symbols p3 through p8 are numbers that are entered into the score. Before the instrument starts playing a note, it loads these numbers. The symbols could be used directly in the following lines of code, but assigning them to meaningful abbreviations makes reading your code easier.
Several things about this code are worth understanding. First, the definition of an instrument begins with “instr” and ends with “endin”. The instrument uses five opcodes: linseg (which creates an envelope of linear segments), lfo (which creates an LFO), vco2 (the oscillator you’ll be listening to), pan2 (which handles the stereo panning), and outs (which sends the left and right signals out to your sound system).
Each of the opcodes has a required syntax. The output in each of them is on the left, except for outs, whose output will never be needed within the instrument. To the right of the opcode are arguments (inputs) in a required order, separated by commas.
For vco2, for instance, the required inputs are the amplitude of the signal to be generated and the frequency. For pan2, the inputs are the signal to be panned and the pan value, which is a number between 0 for the left channel and 1 for the right channel. The inputs to lfo are the amplitude (+/-5) and the frequency (5Hz). The signal from the lfo, called klfo, is added to the base frequency of vco2, producing vibrato.
There’s a lot more to Csound syntax than that, but if you’re comfortable with the ideas in that simple example, you won’t have too much trouble mastering the rest of it.
Links
One of the best places to learn about Csound is from the Floss manual.
The Canonical Reference Manual is an essential tool, but it’s definitely not a tutorial.
You can download Csound in a version for your computer operating system from the main website.
CsoundQt
When you’re first learning Csound, the CsoundQt front end shown in Figure 1 (at the top of this article) may be the best choice. It’s a full-featured IDE. In addition to syntax coloring. auto-completion with hints, and other helpers for writing code, it has a separate panel with which you can create graphic widgets, another panel that can display the Csound Reference Manual, and so on. After writing some code, you can click the Play button to hear the score you’ve created. Alternatively, you can open the Live Events window and type in some notes while Csound is running.
When you’re starting out, you’ll appreciate the hundreds of useful items in the Examples menu. Many of the working examples from the Floss manual are collected here, along with many other things, from simple code suitable for beginners to complex pieces of music.
Before you install CsoundQt, you’ll need to install Csound itself. The CsoundQt installer does not include Csound as a component. (This is also the case with the other two front ends profiled in this article.)
One potential gotcha with Csound in Windows as it’s set up in CsoundQt is that instead of sending the audio output to your ASIO driver directly, it directs the audio through something called Portaudio, which in turn addresses the ASIO driver. Initially, when I installed CsoundQt, it refused to produce any audio output at all, giving me error messages instead. Portaudio wasn’t happy. But later in the day, after I reinstalled CsoundQt, the audio output worked just fine. I don’t know why.
With complex patches, you may want to view your signal routing as a graphic diagram. This requires a separate open-source program called graphviz, which is not installed along with CsoundQt. Once you’ve installed it and used the CsoundQt Configure box to tell CsoundQt where to find it, an item in the View menu will cause graphviz to run. The graphic display is not editable, it’s just a helpful aid for tracing the signal flow.

Figure 3. Using the Cabbage IDE for Csound, you can create your own VST plug-ins for use in any DAW.
Cabbage
If you’d like to develop and run Csound synths or effects as VST plug-ins in your DAW, Cabbage will be happy to help. Dozens of useful code examples are included. The graphic appearance of the plug-ins you create with Cabbage is perhaps a bit primitive, but the musical possibilities are great. If you want to turn pro with your Cabbage creations, a non-free Pro license of Cabbage is available that will allow you encrypt your plug-ins and tag them with your own company name.
Incidentally, Cabbage can also create modules for VCV Rack. I haven’t tested this, and I believe there are some limitations, but if you need something that no existing VCV module will do, Cabbage could offer a solution.

Figure 4. The main window of Blue. Each clip in the upper area contains one or more notes; the notes in the selected clip are shown in the lower area. The timeline is across the top, and mute and solo buttons are in the left column.
Blue
If you want to be able to use Csound in an environment that looks and operates vaguely like a DAW, Blue may be your best choice. Blue has a timeline (as seen in Figure 4) where clips can be arranged. Objects can be embedded inside other objects. It also has a piano-roll editor, note processors for generating complex gestures, and other high-end features. There’s even a built-in mixer, again making it vaguely similar to a DAW.
Blue requires that you install a Java library, but that’s a painless operation, and you never actually have to do anything with Java yourself. It just has to be available to Blue. I wouldn’t recommend tackling Blue while you’re first using Csound, as certain essential features of Csound code are tucked away in separate windows. Until you understand what those features are, you may have trouble figuring out what Blue is doing.

Figure 5. The control panel for the Stria instrument is surely one of the most complex uses of graphic control widgets in CsoundQt. Created by Eugenio Giordani and based on a composition by John Chowning, Stria is included in the Examples folder in the CsoundQt distribution.
About the audio examples
Eugenio Giordani’s Stria is a very complex drone-oriented instrument. I captured its output as audio in real time while occasionally moving the XY controller dots in the lower left corner of Figure 5 in order to change the texture. What else the instrument may do, I haven’t yet discovered.
“Groovish” is a sketch I did ten or twelve years ago using Csound. The pattern of notes is random, but the choice of pitches is narrowly controlled. The pitches are drawn directly from the harmonic overtones over a fundamental.
Tidy wrap-up paragraph
At heart, Csound is a vast and fully configurable modular synthesizer. Every variable that you create is essentially a patch cord. You can plug the variable in wherever you need it, mix it with other variables, and so on. You can build step sequencers, chop up sampled loops, design your own microtonal scales, or create precise polyrhythms that would choke the quantize button in a DAW.
The downside is, you’ll have to be willing to crawl before you can walk, much less run a marathon. Your first experiments with Csound will be things like producing a two-second sine wave. Boring, and not fun at all.
But if you stick with it, and if you’re willing to troubleshoot the weird problems that crop up (and they will definitely crop up!), you can have a real sense of accomplishment, make some amazing music, and be part of a worldwide underground community of bright, friendly people.
Considering the cost (which is zero), that’s not bad at all.


Arturia Rev OCEAN – a Big, Evolving Reverb Ambience Processor

Cherry Audio Releases an Ensoniq ESQ-1 Synth in Software (updated with 2026 features)
Gforce Software Releases Official Prophet 5 Plug-in with Sequential

Arturia’s New MiniLab 37 MIDI Controller

Novation’s Launchkey 61 MK4 White Keyboard Controller With Five Octaves
Arturia’s New MiniLab 37 MIDI Controller

When In Rome…

Introducing Absurdly Quiet Piano Pro

New From AAS – Organix for Chromaphone


