Digital
Expressive E Imagine… the Possibilities
It’s a physical modeling synth that sounds organic, but you don’t need to wear Birkenstocks with socks to read this in-depth review by Jim Aikin. Also, be sure to check out the video and audio.
Sometimes you want a synthesizer to sound like a synthesizer. (Kraftwerk fans, I’m waving at you.) Other times you want it to sound exotic, other-worldly, unpredictable, or organic. For that type of sound, physical modeling synthesis would be a fine choice.
The new physical modeling synth from Expressive E is called Imagine. Probably not in homage to John Lennon, though. The idea seems to be that its sounds will stimulate your imagination, and that’s a very reasonable assumption. This instrument’s sounds are really wonderful.
The modeling technology in Imagine is not new; it’s licensed from Applied Acoustic Systems (AAS), and the sound itself is a lot like what you’ll hear if you play AAS Chromaphone. But Chromaphone is closer to the concept of a mallet instrument: you hit a key, you hear a note.
What’s new and different in Imagine are a smart step sequencer/arpeggiator and a versatile modulation system that puts expressive playing at your fingertips. Complex rhythm grooves coming from one finger on the keyboard? You bet.
This review goes into detail about some of the unusual design choices in Imagine, so I want to make it clear at the outset that I like this instrument a lot! Details of the design may be debatable, but the musical results aren’t.

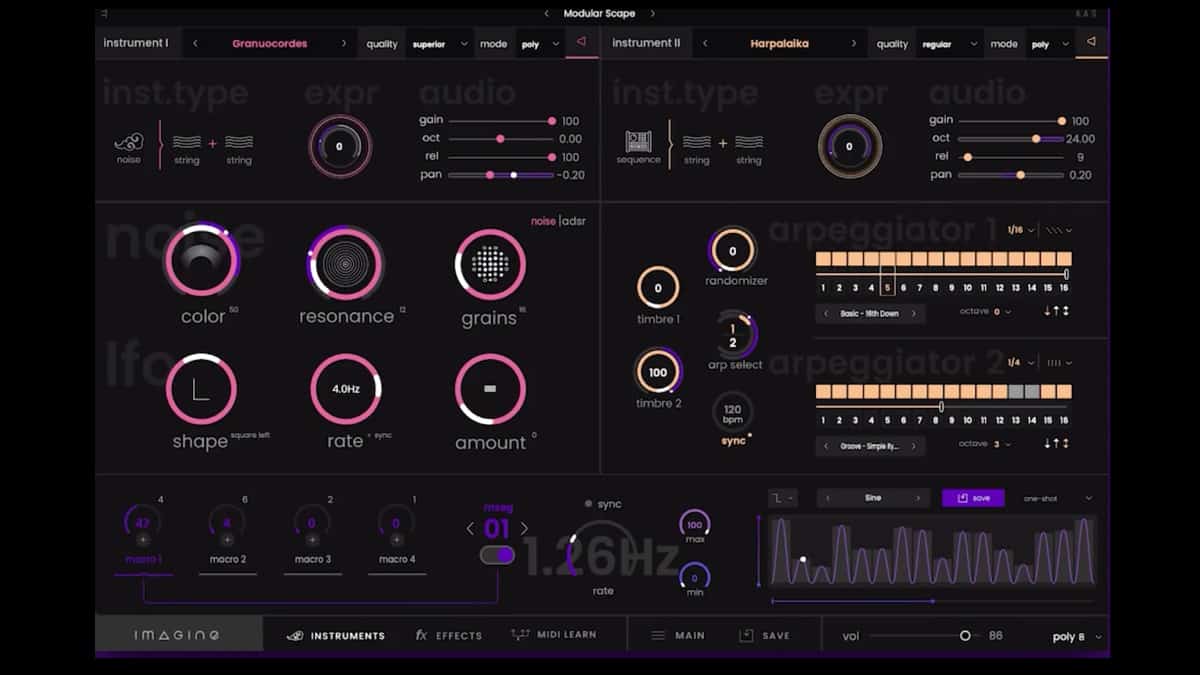
Overview. Imagine runs two sound generators at once. On the panel they’re called Instruments, but that word has a wider meaning, so I’m going to stick with “generator.” Most of the included presets layer the two. (There’s no keyboard split mode, but really there’s no need for one.)
For each generator you can choose one of three sources of excitation – mallet, noise, or a dual sequencer/arpeggiator. The excitation within a generator passes through two resonators in some combination. Imagine’s exciter types are tube, metal bar, skin, and string. You’ll have a small but useful set of parameters to edit, which will change depending on what configuration you’ve chosen.
There are preset templates for each of the 30 combinations of exciter and resonator pair, so it’s easy to see there are some non-user-programmable parameters under the hood. The combined sound then passes through an effects section, which has a couple of choices not found in a standard effects rack.
Along the lower part of the panel is a set of four macro knobs, which can be assigned to any of the parameters. A single knob can modulate a number of parameters, and the knobs can be controlled via MIDI for expressive performance. In addition, each macro knob is associated with its own multi-segment generator. An mseg, as Expressive calls them, is essentially a syncable contour sequencer with up to 16 steps. When active, it overrides the value coming from the knob.

The thing that’s most conspicuously missing from this design is control over velocity sensing. There is some velocity response: hit a key harder, and the sound will get a bit louder and brighter, and perhaps have a faster attack. But there’s no user control over the amount or type of velocity response. The way it’s set up is musically useful: it sounds good. But velocity response is a pretty basic feature to omit.
The standard MIDI pitch-bend is also handled in an odd way. It’s in the Effects page, and it doesn’t bend all of the elements in a physical model equally. When you bend, a single-generator tone will quite likely go out of tune with itself. The bend depth won’t remain the same from one model to another, nor from one range of the keyboard to another. Arguably, this is in keeping with the concept of physical modeling, but it’s not what we’ve come to expect.
The design of the Imagine panel also takes a bit of getting used to. On the plus side, it adds an exotic flavor that you may find inspiring. A boring bank of sliders just wouldn’t evoke the same response.
On the other hand, there’s a lot of wasted space, some of the controls are fiddly, and some of the lettering and modulation amount displays (dark purple on black?) are hard to see. At first I thought a macro knob couldn’t reduce the output level of a generator, for instance, but it turned out I just wasn’t clicking in quite the right place.
Some people may like the panel, some may not. I’ll remain neutral.
Generators. The best way to figure out what’s going on with the Imagine generators, as shown in the video, is to activate the default preset, turn off the second generator, and then start going through the Instrument menu.
Even at this early stage, you may get tripped up. The noise amount in the default preset is zero, so when you go into the Instrument page and select noise as the excitation, you won’t hear anything. So you turn up the noise amount, and then you go back into the Instrument menu and decide to try a mallet excitation. But alas, the noise amount is still turned up! The mallet presets usually need to have noise level at zero.
Ditto with the sequence exciter presets: not only do they need some noise dialed up, they start with a default of a really boring quarter-note pattern, so you’ll want to jack it up to 16th notes before you start auditioning the sounds. None of this is actually a problem; Imagine is a bit of an expert system, that’s all. You’ll need to learn your way around.
When the mallet is the exciter, you have four voicing parameters to play with: shine, mute, position, and impact. Shine adds overtones, mute damps the decay of the sound, and impact turns the mallet gradually into a brush. The position control will bring out different overtones, depending on which resonator pair you’ve chosen.
With some resonators, high values for shine will remove the lower partials of the tone. There’s also a release time slider, which operates just as you’d expect: at low values it stops the tone immediately when you lift your finger from the key.
The noise exciter gives you six knobs to play with: color, resonance, grains, shape, rate, and amount. (Both the noise amount knob and the release time slider are always active as well.) Color and resonance affect the tone, and the grains parameter affects its density.
The amount knob governs how active the pulses coming from the rate knob will be. With a low amount setting, the rate knob will do nothing; the tone will be continuous. But with a high amount, a slow setting for rate will cause the noise input to separate into chunks. (If that doesn’t make any sense as you’re reading this, I apologize.)
The sequence exciter gives you less control over the tone (two knobs labeled “timbre” and one that’s a randomizer). Here, the point is to create rhythms. Each generator has two trigger sequencers with up to 16 steps each, but only one can be active within a single generator at any given time. Interactive switching from one to the other is quite easy.
The triggered steps activate an arpeggiator. This can do the standard things – up, down, up/down pendulum, or chord. (I spotted several minor bugs in the arpeggiator in the 1.0 release.) Multi-octave arpeggios are, again, standard and easy to set up.
A big menu of rhythm templates can be used if you’re not up to the chore of clicking on a few buttons to make your own rhythm. But the secret of rhythmic complexity in Imagine is that the mseg modulation sources can interact with the sequences, for instance by switching from sequence 1 to sequence 2 in alternate measures. And that brings us to….
Modulation Generators. The main way to create an expressive performance in Imagine is by using the four macro knobs. Each of these can be assigned to multiple parameters, and can either be played live or automated in your DAW. (Depending on the features of your DAW, you will probably also be able to control or automate individual parameters.)
As the video shows, each macro knob has two modes: it can operate directly, or its output can be overridden by its associated multi-segment (mseg) pattern generator. When an mseg is switched on, its knob will no longer function as a knob, but if you need to control the output level of the mseg you can do it by automating that parameter separately.
The msegs have several cool features. They can be synced to the DAW transport, of course. Each has a maximum of 16 segments and also a total length that’s a maximum of 16 times the current sync value – but those two are not the same.
A single segment can last for any number of steps in the rhythm. Each step also has its own amplitude and its own curve, and a pop-up menu gives you quite a good choice of curves. As with the sequences in the generator, you can load templates and save your own.
An mseg can run in one-shot mode, in a free-run loop, in a loop that starts over with a new key-press on the MIDI keyboard, or in manual mode. The big limitation in the start-over loop is that it’s always single-trigger. A mseg will keep running until you lift all of your fingers from the keyboard: it can’t restart for each separate voice in a polyphonic texture.
This is significant not least because there’s a resonant filter in the effects section. Filter cutoff can be controlled the old-fashioned way with an mseg, but it won’t respond to every note you play. You’ll get a new filter contour only after you’ve lifted all of your fingers and started a new note or phrase.
In manual mode, the mseg’s rate knob no longer sets a tempo. Instead, it’s used for moving along the X-axis of the mseg’s curve(s) manually. This turns the mseg into a complex remapper for a control input, a very nice and unexpected feature.
Effects. The effects section is fairly simple — a good reverb and delay, some EQ, a compressor, and a couple of modules that can be a filter, a phaser, distortion, chorus, or a couple of other things. Both vibrato and the pitch-bend response are in the effects section; go figure.
Summing up. Imagine is not your grandfather’s Minimoog, let’s put it that way. Physical modeling is not a new technology, but at root it’s a fairly tricky business. That’s why instrument designers don’t give musicians total control over every parameter: if they did, musicians would push the model over the edge, get either ear-bleeding blasts or total silence, and blame the machine.
Like other modeled synths, Imagine gives you access to parameters that you’ll likely find useful. With two simultaneous generators layering their sound, some deep modulation routings, and a variety of resonator models to choose from, there’s no shortage of musical power here.
I could make up a wish list. It would include individual voice triggering in the multi-segment generators, better defaults for the init preset, favorites tags in the preset browser, and a user interface that doesn’t depend on fiddly little objects that are hard to find with the mouse. But none of these is even remotely a deal-breaker. As it stands, the 1.0 release of Imagine is a fine instrument.
About the audio examples. Imagine is not a do-everything synth, so I figured I shouldn’t try making a music track that uses it exclusively. In the first clip, the pad is played by the Cherry Audio MemoryMode and the bass by AAS Ultra-Analog. There are three instances of Imagine – a glittery background rhythm, a plucked sound, and the breathy flute. I did some work on the flute tone to make it fit the track more smoothly, and I’m afraid it’s still more harsh than I would prefer. That’s because a noise source is used as the excitation.
In the second clip, I got bold and did a sketch that’s entirely Imagine. It’s mainly four sounds, with a fifth pad sound heard at the beginning and the end. I automated the fade-in at the beginning in the DAW.


Arturia Rev OCEAN – a Big, Evolving Reverb Ambience Processor

Cherry Audio Releases an Ensoniq ESQ-1 Synth in Software (updated with 2026 features)
Gforce Software Releases Official Prophet 5 Plug-in with Sequential

Arturia’s New MiniLab 37 MIDI Controller

Novation’s Launchkey 61 MK4 White Keyboard Controller With Five Octaves
Arturia’s New MiniLab 37 MIDI Controller

When In Rome…

Introducing Absurdly Quiet Piano Pro

New From AAS – Organix for Chromaphone


