Columns
Introducing Jim Aikin’s Modular Synthesis for Beginners: READY TO RACK!
Want to learn how to program synthesizers, but you don’t know where to begin? In his new series of columns, a former Keyboard magazine editor teaches you what you need to know, and the synth won’t cost you a penny.
When working on a new piece of music, most musicians just click through their synthesizer presets until they find a sound they can use. But even with hundreds of presets to choose from, you may not be able to find exactly what you need. If you want to produce superior music, sooner or later you’re going to fiddle with the parameters on your synth’s front panel, hoping to dial up that magic tone.
But which parameter will do what you’re hearing in your head?
That’s the question this column will try to answer. Over the next few months, we’ll dig into the process of designing sounds using synthesizers. Obscure concepts will be demystified. I don’t promise to transform you into an ace sound designer, but if you follow along, I’m confident that before long, you’ll be able to tweak those factory presets with a lot more confidence and probably with better musical results.
A Nice Setup You Got Here…
This series of tutorials will use VCV Rack as its software platform. It’s free, it’s cross-platform (Mac/Windows/Linux), and it’s incredibly powerful. Its design emulates modular synthesizer hardware, which makes it easier to see and understand what’s going on in a patch. As a side benefit, it has no presets, so you’ll be actively working on sound design from the very start.
VCV is far from the only software-based modular synth system. You can find free programs (notably Supercollider, Pd, and Csound), and also some that are not free (Native Instruments Reaktor, Propellerhead Reason, Cycling ’74 Max, and Softube Modular, for instance). Each has its own strengths and its own limitations. But VCV is popular, well supported by independent developers, and extremely capable. If you’re just starting out in software-based synthesis, you can’t go wrong by starting with VCV. Later on, you may want to branch out.
You can download the VCV Rack software from www.vcvrack.com. Here’s how to do the download and installation, step by step:
1. Open your Web browser and steer it to www.vcvrack.com.
2. If you haven’t done so already, click on Register/Log In. Create an account by giving your email and creating a password.
3. Back on the main page, click Free Download.
4. Choose your computer OS by clicking on one of the three large buttons.
5. Once it’s downloaded, you’ll probably find the installer file in your Downloads folder. Double-click on it to initiate the install process.
6. If VCV Rack launches at the end of the installation process, shut it down.
7. Go back to the website and click on the Library tab. You’ll find a long list of developers—so many that downloading everything may be more confusing than helpful.
8. Click the +Free buttons to the right of the following developer names, so that the buttons change to -Free. You’ll want Alikins, AS, Audible Instruments, Befaco, Bogaudio, Impromptu Modular, JW Modules, ML Modules, mscHack, Nysthi, Pack One (that’s the handle for the modules that will appear in VCV under the stoermelder name), Valley, and Vult Modules Free. These are all free (though Vult and ML have some paid modules).
9. It’s time to launch Rack. But don’t launch the installer again. Instead, find the location of the app on your hard drive (in Windows, it will be in Program Files/VCV/Rack; on the Mac, in your main drive’s Applications folder). Create a shortcut for the Rack.exe executable file, or whatever it’s called in your computer OS. Drag the shortcut to your desktop or to the app launch toolbar.
10. Double-click the shortcut to launch VCV Rack.
11. Go to the Library menu tab. Enter the email and password you used to create your account, and then click Log In.
12. After the menu says “Querying for updates…” you should see a red dot next to the Library menu header. Open the Library menu and click on Update All. If you close the Library menu and open it again, you should see a list of all of the plug-ins you selected in the Library page on the website, as well as percentage figures showing how your updates are proceeding. Some of them are fairly large downloads; this process will last for several minutes.
13. When the updates are complete, you’ll probably see a dialog box telling you to quit VCV Rack and relaunch it. Click OK in the dialog box, and then double-click your shortcut to launch the program again.

You Gotta Start Somewhere…
Now let’s look at a simple but musically usable synthesizer patch. You can download this patch [Click here to download]. Drop it into the folder on your hard drive where you keep your VCV patches. (Mine are in a folder called “vcv rack” in the My Documents folder.)
For best results, start VCV itself by double-clicking its icon on your desktop. Launching it by double-clicking on a patch file didn’t work in earlier versions of the program, so I don’t recommend it. Instead, use the File menu in VCV to open patches.
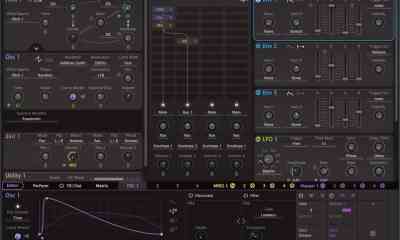
When you open the patch, it should look exactly like screenshot below.

Some of you will have MIDI keyboards already wired into your computer, ready to go. VCV Rack will happily play MIDI. Others will prefer to use the step sequencers that are part of the program. Trying to write a column that will address both sets of readers would get a little messy, so for now I’m going to concentrate mainly on step sequencing. We’ll cover MIDI input in one or two future installments.
The patch you’ll be looking at this month uses not only the “factory” VCV modules themselves, but also modules from Impromptu Modular, JW Modules, mscHack, and stoermelder. I make no apology for starting you off with such a broad-based collection. First, combining modules from various developers is a good part of the fun of working with VCV. Second, we’re going to do a couple of things that can’t be done with the VCV factory modules.
Trying to explain how to use VCV Rack strictly in words would require huge gray blocks of text, so I’ve put together three videos to go with this month’s column.
The first video covers the basics of using VCV Rack:
The second video is an exploration of the patch:
In the third video I’ll show how to expand the patch in order to add more musical interest:
The Key Concepts
In general, we can look at all modules as being either signal sources or signal processors. For instance, an oscillator is a signal source, while a filter is a signal processor. Some modules are both, or they can operate in either fashion depending on the patch.
The signals that a module creates can be either audio or control signals. An audio signal is one that will eventually reach the audio output device and can be listened to. A control signal is one that we don’t listen to directly, but that affects the behavior of some other module. For example, step sequencers and envelope generators are signal sources, but they’re almost always used as sources of control signals, not as sources of audio.
In VCV Rack and some other modular systems, most signals can be used either as audio or for control. You probably wouldn’t wantto listen to a control signal, and in many situations an audio signal would be useless for control purposes, but in principal there is only one type of signal in the system. (This is not true in some other software modular instruments, by the way. Max and Pd have many types of control signals, none of which can be listened to; they’re not suitable for audio. Csound has only two types, but makes a clear distinction between audio and control signals. Like Csound, the hardware modular instruments built by Don Buchla differentiate between audio and control signals.)
VCV Rack functions like a Eurorack hardware system in that all of the signals are, essentially, the digital equivalent of voltages. Any signal can, in principle, be used for anything. However, unlike a hardware system, VCV cables can be either monophonic or polyphonic. That is, a single cable can carry up to 16 discrete signals. For the next few months we’ll be using VCV strictly in monophonic mode, but in a later column we’ll dig into the handling of polyphonic signals.
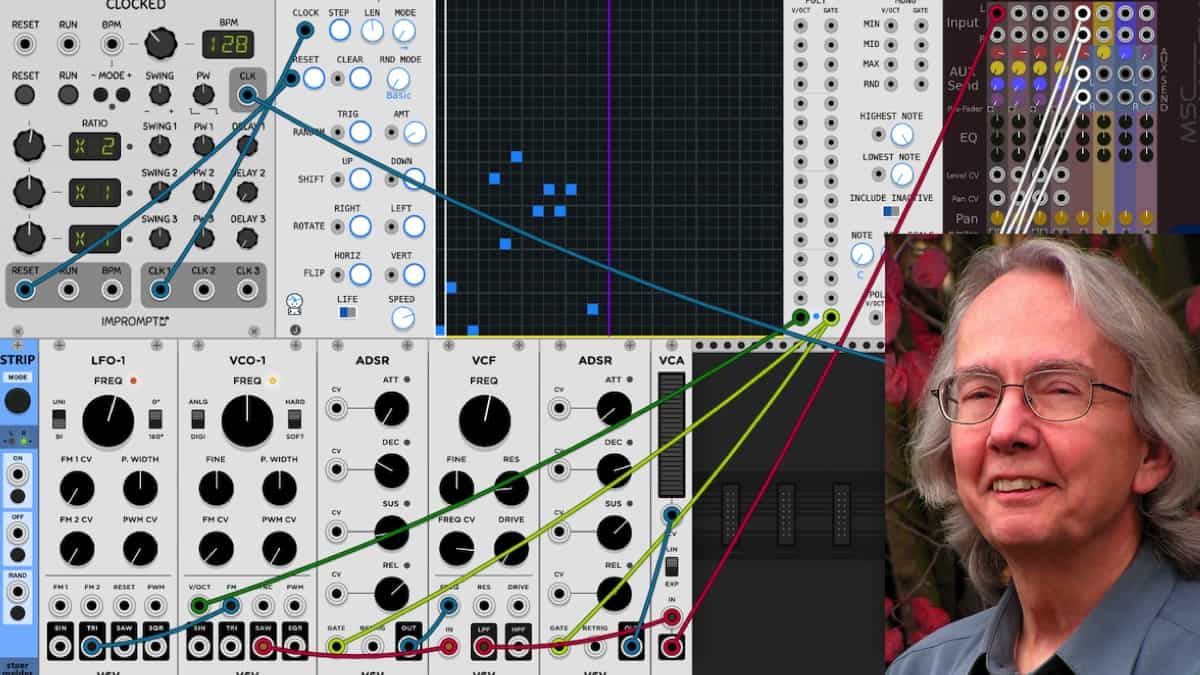
The first thing you’ll need to do after loading the example patch from the File menu in VCV is to set the output of the Audio-8 module (at lower right) so that it will talk to the audio hardware interface attached to your computer. Choose a type of driver (such as ASIO or Core Audio) in the top part of the black box and the specific audio interface you’re using in the middle part of the box.
Next, go to the upper left module and click the Run button. You should hear a nice little stepped melody. If you don’t hear it, you haven’t connected your audio hardware properly.
Got it going? Good. Let’s dissect this patch and see what’s going on.
The synth voice — the thing you’re hearing — runs across the lower row from the left to the middle. You’ll see the following modules:
- An LFO (low-frequency oscillator)
- A VCO (voltage-controlled oscillator), the source of the sound you’re hearing
- A VCF (voltage-controlled filter), which processes the tone coming from the VCO
- A VCA (voltage-controlled amplifier), which controls the loudness contour of each note
- Two ADSR (attack-decay-sustain-release) envelope generators, one to control the VCF and one to control the VCA
Try tracing the signal flow. I’ve colored the audio patch cords in red to make it a bit easier. The saw (sawtooth wave) output of the VCO is routed to the input of the VCF. The LPF (lowpass filter) output of the VCF goes to the VCA. And the output of the VCA goes up to the first channel of the mscHack mixer, the module at the right end of the top row. The mixer’s left and right outputs feed the Audio-8 interface device. (When the mixer receives a signal only at a channel’s left input, that signal is routed to both output channels.)
Rack Around the Clock
But that’s the second half of the story. Notice the outputs of the Clocked module. This is the master rhythm device in the patch. Its main CLK (clock) output is running down diagonally to the Beat input of the mscHack Step Delay. The Reset output of Clocked goes to the Reset input of NoteSeq. In addition, Clocked has three outputs along the bottom — CLK 1, CLK 2, and CLK 3. Each of these can multiply or divide the basic pulse. Notice the X2 just below the word RATIO. That sets the CLK 1 output to eighth-notes (because an eighth-note is twice as fast as a quarter-note). That signal goes to the NoteSeq’s Clock input.
As a result, when the Clocked module is running, NoteSeq receives a clock pulse on every eighth-note. Each time it gets a clock pulse, its step position advances by one step; you can see this happen if Clocked is running.
We’re using the V/oct (volt-per-octave) and Gate outputs at the bottom of the tall column in NoteSeq (to the right of the grid). Each time NoteSeq finds a lighted square in its grid, it sends this note to the V/oct and Gate outputs. The V/oct output goes to the VCO’s V/oct input, thus controlling the VCO’s pitch. The Gate output goes to the Gate inputs of the two ADSRs, so that every time a note is in the NoteSeq grid, the ADSRs receive a gate signal, and they play a note. In particular, the ADSR connected to the VCA has to receive a gate, because if the VCA doesn’t open, you won’t hear anything.
Parting Shots
In this introductory column we’ve covered a lot of
For more information on how to get up and running with VCV Rack, feel free to download and read my short book, How to Rack. There’s a link to it on my music blog at https://synthage.wordpress.com/2019/07/09/how-to-rack-the-book/.


Introducing Absurdly Quiet Piano Pro

Solid State Logic Introduces the SSL 1 Audio Interface

New From AAS – Organix for Chromaphone

The Passing of Jack Hotop, Legendary Sound Designer and Innovator

Arturia Memory V Memorymoog Software Emulation Is Here

u-he Zebra3 – the Synth and Software Review

New Quadtrack Computer-Based Groovebox
Arturia Memory V Memorymoog Software Emulation Is Here

New AAS Acacia Fantasy Pack